

Download PDF Packet Here
READ the Earth!
July 27 - August 1
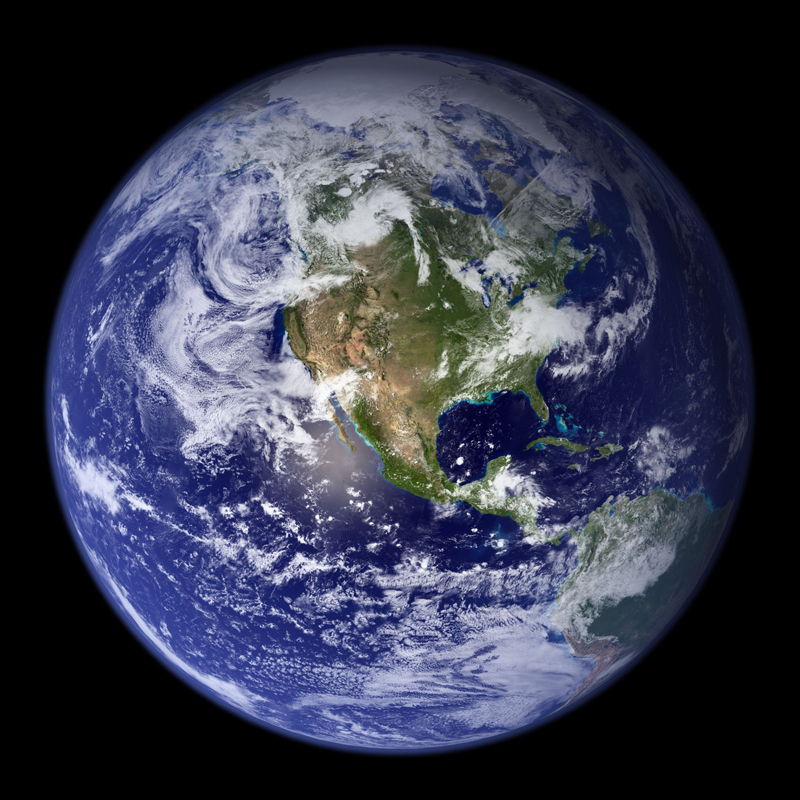
Sitting in the Goldilocks Zone of a fascinating, evolving universe, twirls a lovely blue and green planet. Topped and bottomed in ice, cocooned in clouds, and bedazzled by stars, Earth is a unique and glorious place to call home. This week we look at some of the unusual features of our home and why some of those features keep changing. We will also explore sites in Utah that show how much our earth has changed over the centuries. Pull out your magnifying glass and your exploring hat. It’s time to READ the earth!
RESEARCH- READ a few books. Ask a few questions. Find something that interests you, and dig, literally, a little deeper.
EXPLORE- Put on some sturdy shoes and go see what’s out there. What made those mountains? Why does the rock curl like that in Provo Canyon? Why is the Great Salt Lake salty? How did bison get to be on Antelope Island? Did dinosaurs really call Utah home? Did Utah have volcanoes?
ACTIVITIES – Make crystals. Hike to Timp Cave. Make fossils. Paint with mud. Design scavenger hunts. Make gumdrop flowers. Play! Learn! Laugh!
DISCOVERY – What did you learn about Earth? Would you rather study volcanoes or caves? Rocks or animals? What can you do to keep your part of Earth healthy and happy?
Volcanoes
When scientists use the term Earth, they are referring to the land, the oceans, and the atmosphere of the planet. This week, as we investigate Earth, we will focus mostly on the land. Earth is made of layers. Some people like to use peanut M&M’s to demonstrate the layers. (Some of us just like eating M&M’s.) At the center we find a solid core (the peanut), surrounded by a liquid core (the chocolate), covered by a mostly solid mantle (use your imagination). On top of the mantle sits the crust, a series of large, flat pieces of Earth called tectonic plates (the candy covering, especially after you bite it). We stand on the crust. Because these plates sit on top of a surface that moves, the plates move. One plate will be stronger or faster than another plate so they push against or grind past each other. Most of this movement is very slow, only around ¼” to 4” a year. That is still enough movement to build pressure between the plates to make mountains, earthquakes, and cracks that allow magma to seep out or to explode. Our earth is a busy, busy place.
Volcanos are one things that are made when the plates get moving. Earth has about 1,500 active volcanoes. Between 20-30 of those erupt each month. Not all eruptions are huge, fiery explosions with lava, ash, flying boulders, gas, and lightening. Some eruptions are simply smoke or an oozing of lava that slowly works its way down the volcano’s side, eating everything in its path.
Utah is home to eight volcanoes. A couple have the traditional cone shape, worn down a little over time. Other Utah volcanoes are lava fields. Some look like mountains and are easy to miss. None of our volcanoes are threatening to erupt. If you want to see one, you’ll need to travel to southwest Utah and visit Zion, Cedar Breaks, Snow Canyon, or Bryce Canyon. Or you can make a volcano at home.
Rice Krispy Treat Volcano
Press your favorite Rice Krispy treats around a tall, straight vase. The vase will act as the main vent for the magma to come out of. The Rice Krispy Treats will form the volcano shape. Use fruit leather to make the lava flowing down the side of the volcano. Add candy rocks, plastic dinosaurs and trees, or other small candies to create an epic adventure all around the volcano. Pour a small amount of water into the vase and carefully add a small piece of dry ice to make the ash cloud.
Volcanoes don’t just create havoc where they are. Some volcanoes are big enough to disrupt life all over the planet. Investigate and find out which volcanoes have been the most troublesome. Did you know that when Krakatoa, a volcano in Indonesia, erupted in 1883, the dust in the atmosphere made the moon look blue and sometimes green to people all over the world for two years after the eruption?
Lemon Lava Cakes
In a microwave bowl, melt:
8 oz. white chocolate
8 Tablespoons unsalted butter
Whisk in:
1 ½ cup powdered sugar
3 egg plus
3 egg yolks
1 teaspoon vanilla
2 Tablespoons lemon juice
Zest of 2 lemons
Gently stir in:
½ cup flour
¼ teaspoon salt
Do not over mix. Butter the cavities of a 6 count jumbo muffin tin or like-sized ramekins. Divide batter into tins. Bake at 425 degrees, 15-17 minutes. Loosen, invert onto plates. Top with powdered sugar, whipped cream, fruit, or ice cream. Serve immediately.
Caves
Besides dust, islands, and summer-less years, volcanoes can also make caves. Caves are openings in Earth that are large enough for humans to explore. Caves can be made by erosion (wind and water), glaciers melting and a whole bunch of other ways and in a variety of places. Caves are everywhere. Inside caves we can find a lot of strange things. One cave has over 2 million bats. Lots of caves have stalagmites, stalactites, and snotties--strings of dripping slime, made of cave bacteria, that hang from the cave ceiling. Don’t touch it, though, because it can drop burning acid on you. Some caves are very different and have something really unique inside, like ….
The Cave of the Crystals - Cueva de los cristales in Naica, Chihuahua, Mexico
This very unusual cave was discovered in 2000. The cave is filled with gigantic crystals; most are 13-19 feet long, very thick, and very heavy. The longest is 36 feet. That’s the length of a telephone pole! It can weigh as much as 7 elephants. The cave is very dangerous. It is hot, humid, and almost impossible to breathe in. Most explorers could stay in the cave only 10 minutes at a time, making it very challenging to explore around all the crystals. The cave was flooded in 2017 so no one can peek inside it now. But, if you want to make your own crystals, look at this:
Crystals
Growing your own crystals is pretty simple. All you need is a super-saturated solution, a jar, something for the crystals to form on, such as a pencil or a string, and a whole lot of patience. Crystals take time to grow.
To make the solution, four elements work best: Borax, Epson salt, sugar, and alum. Borax is the easiest. Sugar takes the longest. Alum is beautiful but pricey. Dissolve as much of the element into hot water as you can. Borax needs really hot water to dissolve, so be careful. Keep adding and stirring until the element has completely dissolved. It is now super saturated. Pour solution into a clean jar or bottle. Tie a string onto the pencil. On the other end, tie what you want the crystals to grow on. The pencil will sit across the top of the bottle so the string will fall into the center of the solution. You don’t want the crystals to form on the walls of the bottle.
Items that work really well for growing crystals include seashells, jewelry, coins, egg shells, pompoms, rocks, fake flowers, pipe cleaners bent into interesting shapes, and skewers. Set bottle in an out-of-the-way place and watch as the crystals slowly form.
Epsom salts grow best if refrigerated. Sugar will take 3-7 days, if ignored. Try not to move or wiggle the bottle while the crystals are growing.
The Grotte de Lascaux - France
This amazing cave was discovered in 1940 by an 18-year-old boy, Marcel, who was chasing his dog. The dog, Robot, fell into a hole and disappeared. Marcel ran to get help. His three friends helped him crawl into the hole to rescue Robot. They thought they had found a secret tunnel to a nearby manor house. What they really found was a cave with ancient paintings, covering the ceilings and walls, created by people who had lived in the area 15,000-20,000 years ago. Hundreds of pictures are in the Lascaux caves, mostly large animals and plants, painted in red, yellow and black. The paint, made from minerals and animal fat, was blotted or wiped on. Charcoal details made them come alive. All are unique and interesting.
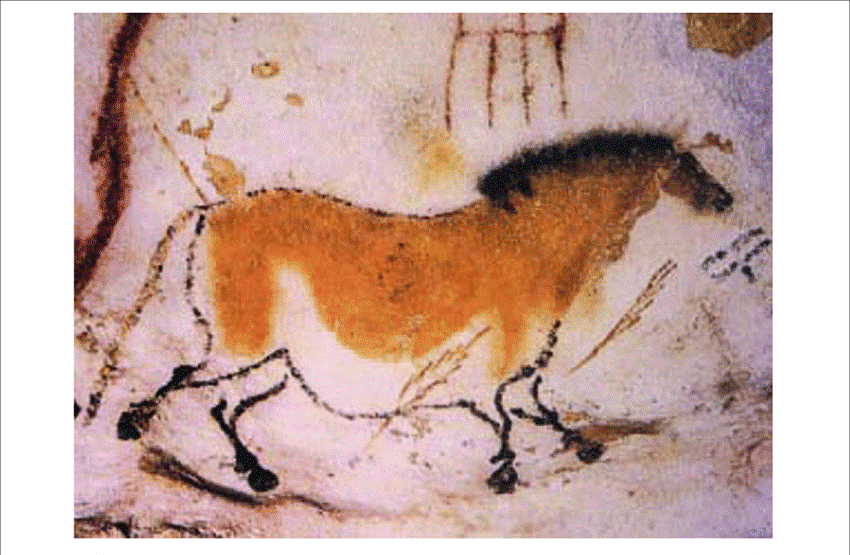
Create your own version with mud paint and cardboard.
Mud Paint
You’ll need: mud; a form of paint, such as powdered tempera, food coloring, or craft paint; a squirt of Dawn dish soap, and water.
In a bowl you don’t love, mix ½ - 1 cup mud with 1-2 Tablespoons coloring, Dawn, and enough water to get a nice paint texture. Set out large pieces of cardboard. If you want to make your own cave paintings, consider painting the inside of a large box. You can sketch out a design or just free hand and play. Use small paint rollers, foam brushes, or paint brushes, or devise something a caveman could have used with leaves and vines. Clean up outside with a garden hose.
Timp Cave - American Fork Canyon
We have a cave in our own backyard! How cool is that? Just up American Fork canyon, you can find the visitors center for Timp cave. To get to the cave itself, you walk 1.46 miles uphill. What makes this cave so unique is the fact that, standing 6,730 feet above sea level, you can find fossilized sea shells and coral there. A way, way long time ago, the whole area was under water. Timp Cave was at the sea shore. Then, after a lot of shifting and sliding of mountains and water ebbing and flowing, the area we see now settled into place. Inside the cave you can see the “heart” of the mountain and absolute darkness, which is where you can’t see anything! Not even your hand in front of your face! It’s cold in the cave, so take a jacket.
Fossils
Timp Cave isn’t the only place to find fossils. In fact, Utah as a whole is a great place to go fossil hunting. The water that covered Timp Cave used to cover most of the state. That is why you can find fossils from sharks, rays, and crocodiles. We also have trilobites, mammoth tusks, fish, reptile, and dinosaur fossils. Fossils, Latin for “obtained by digging,” are the bones, teeth, or impressions of a prehistoric animal or plant. We find them petrified or as a mold or cast in rock. Some are found in tree sap called amber. They are very cool. Visit the Cleveland-Lloyd Quarry in Emery County and watch scientists unearth dino bones. Other places throughout the state have places where you can dig for fossils. Wherever you go, just keep your eyes open. One couple went for a walk in 2007, found a shin bone of a Diplodocus, reported it, and helped paleontologists excavate the site. It is unofficially named after them!
Make Your Own Fossil
Dough Recipe: 1 cup flour, ½ cup salt, 1 tablespoon oil, 2 teaspoons cream of tartar
Mix all ingredients in a pot and stir over medium heat. Dough will start out lumpy and runny and then, poof, it will form into a ball. Remove from heat. Cool slightly, then knead on a non-stick surface, 3-5 minutes. Dough will feel like Playdough.
Use dough to make flat rocks to press your fossil shape into. Fossils can be made with leaves, coins, shells, pipe cleaners bent into fun shapes like a seahorse or nautilus, small plastic toys, or even a foot. Let dough air dry.
Rub shoe polish on the fossils to “age” them. Brush on a sealer and bury them somewhere. Send out an expedition of archeologists to find them.
Read about two of the most determined, cantankerous, focused, mean paleontologists ever. Edward Drinker Cope and Othniel C. Marsh were dinosaur hunters who really didn’t like each other. One of them even named dinosaur poop after the other guy. They found a lot of bones and started the Bone Wars.
Dino Rescue
You’ll need: a balloon, a small plastic dinosaur, a spray bottle with warm water, salt, and a small hammer.
Blow up the balloon to stretch it out, then let the air out. Stretch the balloon open and carefully insert the dinosaur. Fill the balloon with water. Tie. Freeze filled balloon, taking care to keep the egg shape. When you are ready to rescue the dinosaur, peel off the balloon. Use the spray bottle to melt the ice or sprinkle the egg with salt. When the ice has softened, use the hammer to crack it. Beware of ice chips flying off the egg.
Fossils are important in helping us figure out Earth’s story. What lived here and when? Where did the plants and animals go? How did they live? By seeing where in the layers of Earth’s crust the fossils sit, we can learn much. Earth’s layers are made of different types of rock: igneous, metamorphic, and sedimentary. Scientists take core samples all over the world to discover how the land has changed or how old the ice is. You can try it at home.
Core Sample Sandwich
You’ll need:
Slices of bread (white, wheat, rye, cinnamon swirl, …)
Different spreads (peanut butter, Nutella, frosting, jelly, …)
Filling pieces (raisins, mini marshmallows, chocolate chips, coconut, smashed candies, …)
Directions:
- Place one slice of bread down. This is a soil layer.
- Spread with one of the spreads. This is another soil layer, such as clay.
- Sprinkle with one of the fillings. This represents the shells or stones that are deposited by running water or melting snow.
- Continue layering with bread, spread, and fillings. Finish with bread on top.
- Use a piece of paper towel or gift wrap tube, taller than the sandwich, and press the tube through the geology sandwich.
- Lift out the tube. Gently push the sandwich core out of the tube.
- Draw a picture of your core sample, identifying the different layers with different colors and symbols.
Experiment
The Power of Sunlight! | Science Project for Kids https://www.youtube.com/watch?v=0Qmgdz9E47s
Crafts
Seed Mosaics (recommended for ages 5 and up) https://www.discoverygateway.org/steam-learning-lab-seed-mosaics/
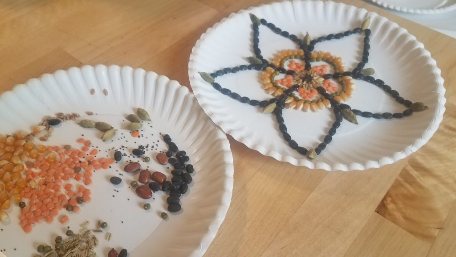
Materials:
- Various seeds (beans, lentils, popcorn, and whole spices, etc.)
- Glue
- Cardboard, paper plates, or sturdy paper
Directions:
- If you want you can draw your design with a pencil before you start adding seeds, or you can make a design free hand.
- Lay out some seeds to see how it will look before you start gluing, using D4 glue. After the glue dries, you have your mosaic!
More Fun with Seeds
- If you want to know more about seeds, you can open one up and look inside. Large dry beans are best for this. Soak the beans for about a day or until they begin to absorb water and swell up. Then you will be able to split the seed open and look at the inside.
- https://garden.org/onlinecourse/PartI5.htm
- Planting seeds is a great way to see how one small seed can grow into a big plant!
- Video: https://youtube/pg92cspLy0I
- Look around your kitchen for seeds that we eat as food!
Scavenger Hunt Bingo
A warm summer evening is a perfect time to wander around the neighborhood and see what you can see. Or hear. Or touch. Before leaving the house, create a 5x5 grid on paper. Fill in each space with a word or picture or both of the things you might expect to find. Pick a theme, such as sounds you might hear (insects, airplanes, dogs, birds, wind), animals or plants you might see, and textures you can find (smooth, rough, prickly, sticky, soft). How many did you actually find?
Gumdrop Flower Garden
Roll gumdrops between sheets of waxed paper with a rolling pin until they are thin disks. Carefully pull the waxed paper away. With clean, sharp scissors, snip petals around the edge of the disk to make a daisy. For a rose, roll one disk into a tight coil. Wrap another disk around it, pinching it at the bottom and flaring the top out. Continue adding disks until the rose is the size you like. Five-petal flowers are made by setting five disks together, with one disk in the center. Use flowers to decorate cakes, dirt cups, or cupcakes. Easy, fun decorating for kids.
Flower Basket Cookies
Using your favorite cookie, decorate the top with half a mini-sized peanut butter cup. Slice a chilled peanut butter cup from top to bottom and frost cut side onto the cookie. With some imagination, it will look like a flower pot or basket. Use frosting, sprinkles, or candies to make flowers to sit in the basket. You can use frosting or licorice to make a handle for the basket.
Especially for Preschoolers
- Animal hunt. Hide pictures of 6 animals. When your child finds one, they get to tell you all about it. Aim for 2-3 specific details about each animal.
- Animal Bingo. Make a bingo card with one animal in each square. Use animal sounds or verbal cues (it makes milk) for them to mark the square.
- Red Light, Green Light. The caller stands at one end of the room or play space. They turn around and yell, “Green light.” The other players run toward the caller until the caller turns around and says, “Red light.” Anyone caught moving after the red light is called has to go back to the start. The player who reaches the caller first becomes the next caller.
- The leaf game. Cut out leaves in different colors- green, red, yellow, orange, brown, purple. Put the leaves on the floor. Give directions, such as, step on the green leaf. Put your elbow on the yellow leaf. Practice body parts and colors together!
- Leaf people. Go on a walk to find the perfect leaf. Glue leaf in the center of a paper. This will be the body. Draw on arms, legs, and a head. Does your Leaf Person need friends or a family? A pet? Looks like you’ll need more leaves!
Submit a Picture or a Message
At the end of the week, send us a picture or a message highlighting your favorite activity. One submission per family per week. Submissions are due by 5:00 pm Saturday, August 1. With your email submission, your name will be entered in a drawing for a gift card to a local business. One prize will be awarded each week. Winners will be notified on Mondays.
Tag us on Facebook and Instagram
#PGREADallaboutit
#WeREADyouloudandclear
Books to Read
Click here to put books or DVDs on hold
The Nest That Wren Built by Randi Sonenshine PIC SON
Old Rock (is not boring) by Deb Pilutti PIC PIL
One Mean Ant by Arthur Yorinks PIC YOR
Bad Dog by Mike Boldt PIC BOL
A Tiny Brown Monkey on the Big Blue Earth by Tory Christie PIC CHR
The Three Billy Goats Buenos by Susan Middleton Elya PIC ELY
Hike by Pete Oswald PIC OSW
At the Pond by Geraldo Valério PIC VAL
Thank you, Garden by Liz Garton Scanlon PIC SCA
Follow Me, Flo! By Jarvis (Listen to the author read it https://www.youtube.com/watch?v=RER5zRz766k) PIC JAR
Take Your Pet to School Day by Linda Ashman PIC ASH
Sloppy Takes the Plunge by Sean Julian PIC JUL
Quiet Wyatt by Tammi Sauer PIC SAU
My Ocean is Blue by Darren Lebeuf PIC LEB
Boy Of the Painted Cave by Justin F. Denzel J FIC DEN
I survived the eruption of Mount St. Helens, 1980 by Lauren Tarshis J FIC TAR
Amazing Volcanoes Around the World by Simon Rose J Places
The Natural World by Jon Richards J Science Earth
My Book of Rocks and Minerals by Devin Dennie J Science Earth
Mountains of Jokes About Rocks, Minerals, and Soil : laugh and learn about science by Melissa Stewart J Science Earth
Ultimate Secrets Revealed!: A Closer Look At the Weirdest, Wildest Facts On Earth by Stephanie Warren Drimmer J Curiosity
Websites to Visit
Could I Dig a Hole Through the Earth? https://www.youtube.com/watch?v=oEW_Qwj6ZCE
Earthquakes! Thanksgiving Point https://www.facebook.com/ThanksgivingPoint/videos/622541931925752/
Caterpillar to Butterfly Life Cycle https://www.youtube.com/watch?v=WcokL7PRrnY&feature=youtu.be
Experience UTAH Virtually https://www.visitutah.com/articles/how-to-experience-utah-virtually/
How Does a Seed Become a Plant? https://www.youtube.com/watch?v=tkFPyue5X3Q
Museums to Visit
Ogden – Eccles Dinosaur Park
Salt Lake City – Natural History Museum
Lehi – Museum of Ancient Life
Provo – BYU Museum of Paleontology
Vernal – Dinosaur National Monument; Utah Fieldhouse of Natural History; Red Fleet State Park
Price – Prehistoric Museum at CEU
Parowan – Dinosaur Tracks
St. George – Discovery Site at Johnson’s Farm
Moab – Copper Ridge Dinosaur Trackway, Mill Canyon Dinosaur Interpretive Trail; Poison Spider Dinosaur Trackway
Blanding – Dinosaur Museum